Page Design

Thursday, December 6, 2012

Homemade Blueberry Muffins

I saw these on pinterest and they lingered in my mind for months before I finally made them! Can't beleive I waited so long!!! For some reason, probably because it's my favorite part, I always thought streussel was crazy hard to make, but now I know that it's usually the easiest bit to put together!!! Thanks to "A Cook's Quest" for the simply delicious recipe!!!


Streussel Topping

Ingredients:
3 T white sugar
3 T brown sugar
1/3 cup flour
5 T melted butter

Directions:
Mix the white and brown sugars and flour together. Melt the butter, and add the butter just a little a time until the mixture combines into crumbs the size of peas. Set aside!

Blueberry Swirl

Ingredients:
1 C. Fresh Blueberries
1 tsp. Sugar
1 Tbs. Water

Directions:
Add everything into a saucepan and bring to a simmer on the stove. While stirring, gently mash the blueberries. Continue to simmer until the mixture has been reduced to half. Set aside!

Muffin Batter

Ingredients:
2 1/2 C. Flour
2 1/2 tsp. Baking Powder
1 tsp. Salt
1 1/4 C. Sugar
2 Eggs
4 Tbs. Melted Butter
1/4 C. Oil
1 C. Buttermilk
2 tsp. Vanilla
1 C. Fresh Blueberries

Directions:
1.Pre heat oven to 425.
 2.In a large bowl whisk flour, baking powder and salt, set aside.

3. In a seperate bowl whisk together the sugar and eggs.
4. Mix in the melted butter and oil.

5. Mix in the buttermilk and the vanilla.
6.Gently mix, with a spatula, the sugar/egg mixture and fresh blueberries into the flour mixture. Gently stir until the mixture is just moistened. You want it lumpy with spots of dry mixture. Please do not over mix!!!
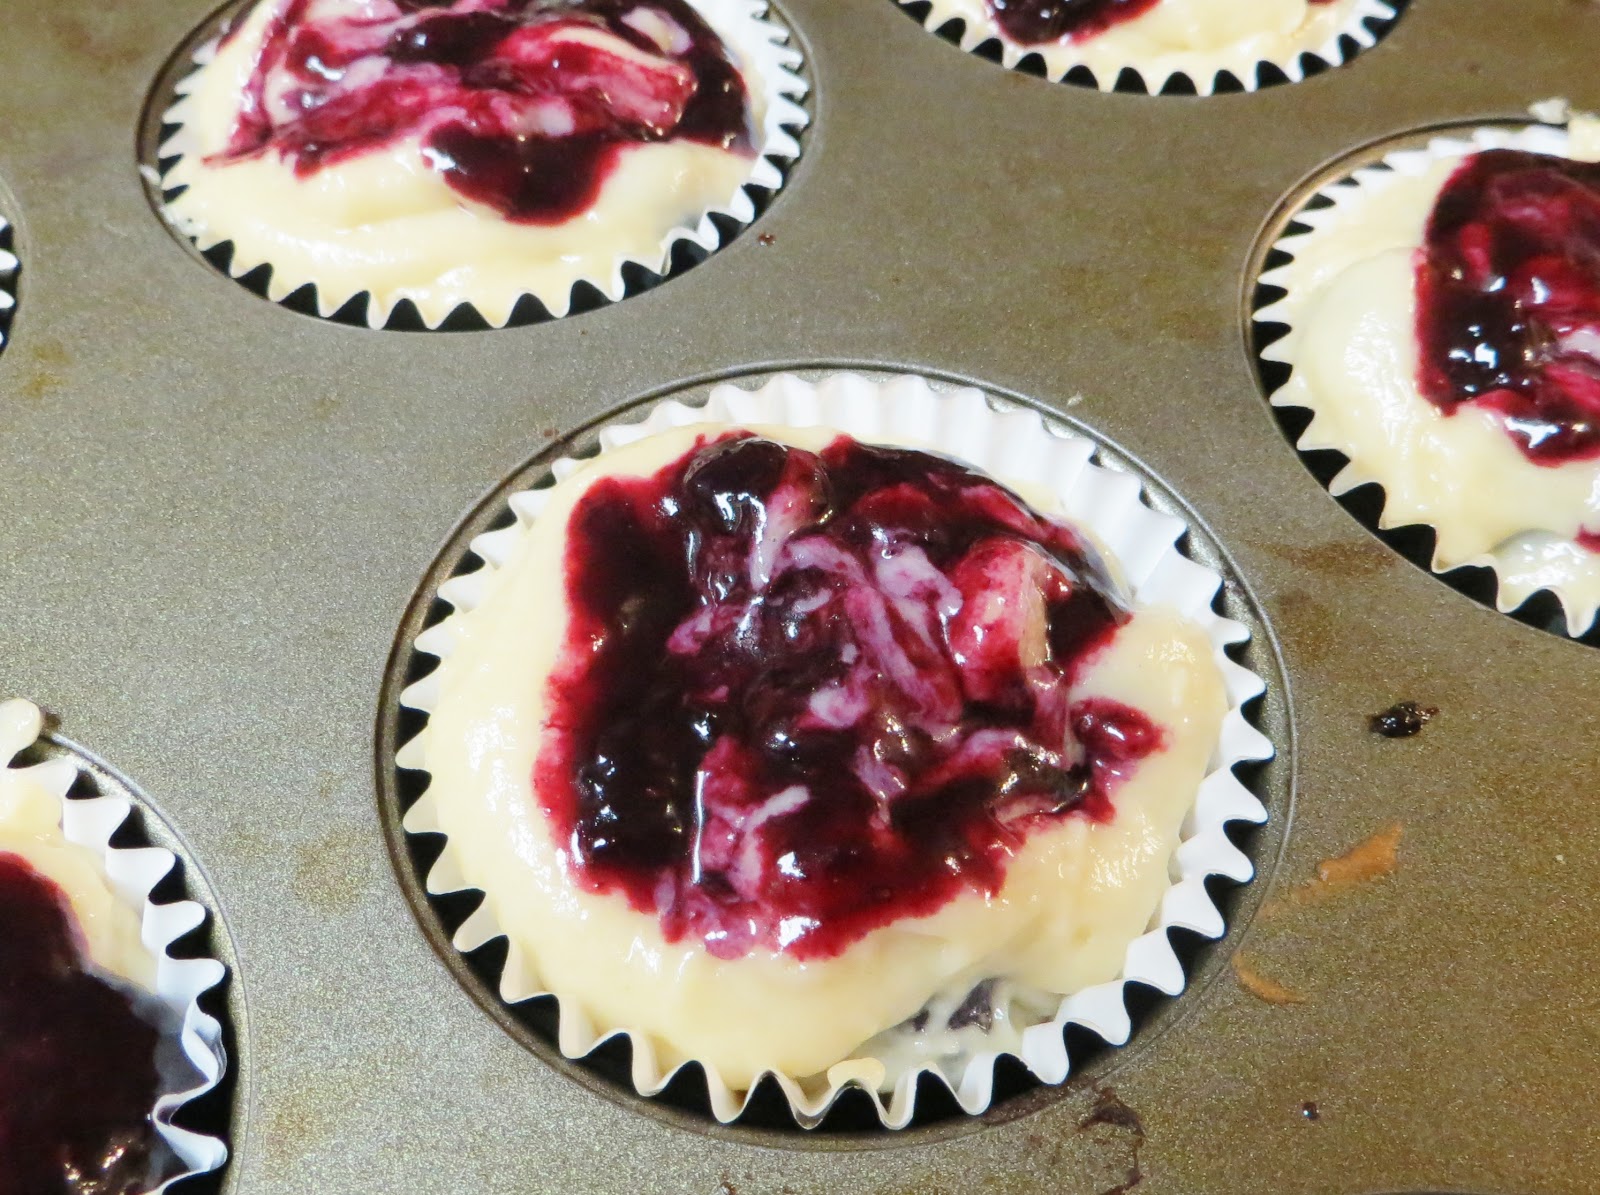
7. Pour the batter into prepared muffin (or cupcake) pans with liners. The batter should completley fill the cups and mound slightly!

8. Evenly spoon the Blueberry Swirl mixture over each muffin, then use a toothpick to swirl over the tops.

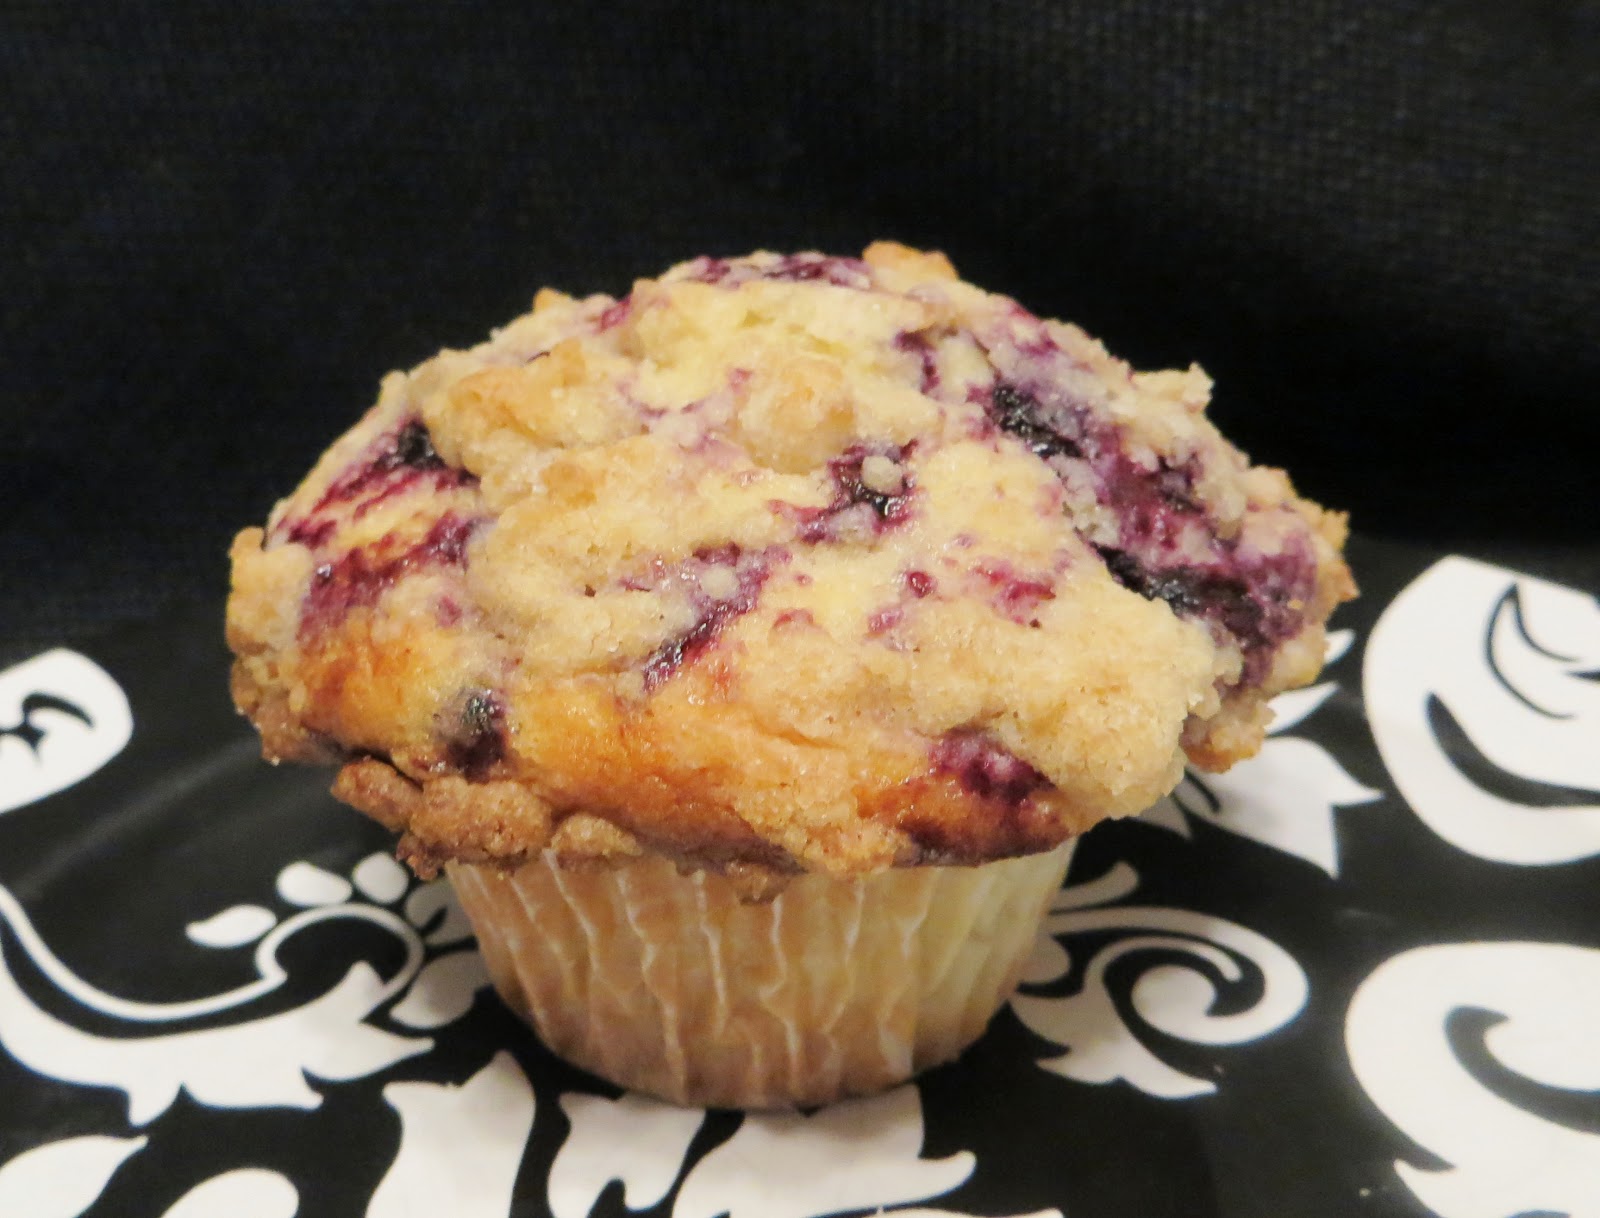
9. Heavily sprinkle the streussel mixture over each muffin. Use plenty because when the muffin bakes and expands the streussel gets dispersed.

10. Bake 17-19 minutes, until the muffin tops are nice and golden and a toothpick comes out clean.

11. Let the muffins cool in the pan for a few minutes before transferring them to a cooling rack.


Rich Fudgey Brownies

Finally!!!!! An amazing brownie recipe!!! If you've been around the blogosphere world looking at baking recipes, you've most likely heard of King Arthur Flour! To be honest I was a bit skeptical at first, I mean how different can flour be from brand to brand! Well, I'm here to tell you there is!! And its a BIG difference! This is the brownie recipe from King Arthur Flour and they are melt in your mouth, can't stop at just 1, the ultimate chocolate fix, best brownie EVER! Ya'll will seriously be missing out if you do not try these.... SOON!

Ingredients:

4 Eggs
1 1/4 cups Cocoa (If you want them ultra rich, use Dark Cocoa!)
1 teaspoon Salt
1 teaspoon Baking Powder
1 tablespoon Vanilla
1 cup Unsalted Butter
2 1/4 cups Sugar
1 1/2 cups King Arthur Flour
2 cups Chocolate Chips

Directions:

1. Preheat oven to 350 and lighlty grease a 9x13 pan.
2. Crack the 4 eggs into a bowl, and beat them with the cocoa, salt, baking powder, and vanilla till smooth.
3. In a bowl add butter and sugar, and heat in the microwave until the butter is melted.
4. Continue to microwave, just until the mixture is hot, but not bubbling; it'll become shiny looking as you stir it. (This is what causes the shiny top crust of the brownies!)
5. Add the hot butter/sugar mixture to the egg/cocoa mixture, stirring until smooth.
6. Add the flour and chocolate chips, again stirring until smooth. 
7. Pour the batter into the 9x13 pan and bake the brownies for about 30 minutes, until a cake tester inserted into the center comes out clean.
8. Remove them from the oven and cool on a rack before cutting and serving.

9. Eat as much as you can before your husband gets home!!! And make sure you have plenty of vanilla ice cream to top!

Chicken Enchiladas

This is one of my family's very favorite meals, which is fine with me since it's my mom's recipe!!! In fact this is my sister's most asked for recipe from her husband! These are so easy to whip up and taste amazing! (Sorry that the picture really diesn't do these babies justice!!!)

Ingredients:


1 Can Cream of Chicken Soup                         
1/3 Cup Sour Cream- or to taste
2 Cups Shredded Chicken                                               
 1 Can Diced Green Chilies
1/2 tsp. Chili Powder                                                
1 /2 tsp. Garlic Powder
1/4 tsp. Salt                                                                
 ½ tsp. Pepper
3/4 Cup Grated Cheddar Cheese (add another 1/4 c. to spinkle on top!)               
1 Large Can Green Enchilada Sauce
1 Pkg. Tortillas

Directions:


1. Pre-heat oven to 350.
2.Put the shredded chicken into a bowl and add the soup, sour cream, green chilies, chili powder, garlic powder, salt, pepper and cheddar cheese.
3.Put about ½ cup of the chicken mixture onto each tortilla and roll them up.
4.Place the rolled up tortillas into a 9x13 pan and cover with the enchilada sauce. (Tip slather a bit of the enchilada sauce on the bottom of the pan before placing the enchiladas in to prevent them from sticking to the pan during baking!!!)
5. Bake for 30- 45 minutes. Sprinkle extra cheddar cheese on top during the last 5 minutes!

(p.s. I LOVE using Rice a Roni's Mexican Rice as a side dish and adding some corn to it!!! Sooo yummy!!!)


Maple Bars

I got this recipe from my dear Aunt! They are delicious and the best homemade donut I've ever had!! Don't trust me? Well, make them for yourself and see!

Ingredients:


2 Cups of Milk                                                       
 
  2 tsp. Salt

4 Tbs. Butter                                                           
 
 2 Tbs. White Sugar

1 Tbs. Yeast                                                            
 
  2-3 Cups of Flour

Oil for frying                                                                       


Directions:

1. Scald the milk, salt and butter in a sauce pan. (To scald is to almost bring to a boil on low heat.) When small bubbles start to arise, remove the mixture from the heat.
2. Cool the mixture until it is slightly warm to the touch.
3. Add the sugar and the yeast and let the yeast raise (aka let sit) for about 10 minutes.
4. Move the yeast mixture to a bowl and, using a mixer, add the flour, just enough to make a soft dough. You’ll know you’ve added enough flour once the dough starts to pull away from the sides of the bowl when mixing.
5. Knead in the mixer for 5 minutes then, leave the dough on the counter to rise.
6. Once the dough has doubled in size (about an hour,) roll it out on a lightly floured surface, about ½ in. thick. Let it rest again for about 15 minutes.
7. Cut the dough into 2-3 in. rectangles. Or any shape really!!
8. Deep fry the dough in oil until they puff up and are golden brown on each side. These will fry up very quick!
9. Let the bars cool completely then frost with the following Maple Frosting!

Maple Frosting

Ingredients:

2 Cups Powdered Sugar                                       2 Tbs. Milk

1/3 C. + 1Tbs. Melted Butter                              2 tsp. Maple Flavoring

                                   
Directions:
Mix all the ingredients together in a bowl untilw ell combined then frost the cooled bars!
 

For a little something extra fill the middles with ReddiWhip!


Friday, October 5, 2012

Homemade Oreos

 
Thats right! And everyone knows I'm a sucker for a cookie with frosting in the middle!!! (Hello Mrs. Fields Cookie Sandwiches!!!!) Anyways, I've been looking around for a good recipe and lo and behold!!! And because I'm so, so very generous, I've decided to share the recipe with my friends and family! Lucky you! =D
Thanks again to Sugar Cooking for the fabulous recipe!

Ingredients:

  •  1 1/4 C. Sugar
  • 1/2 C. + 2 Tbs. Butter at room temp
  • 1 Egg
  • 1 tsp. Vanilla
  • 1 1/4 C. Flour
  • 1/2 C. Hershey's Special Dark Cocoa
  • 1 tsp. Baking Soda
  • 1/4 tsp. Baking Powder
  • 1/4 tsp. Salt


  • Directions:


    1. Cream the butter and sugar in a mixer for 3 minutes or until fluffy.
    2. Add in egg, mix, then add in vanilla and mix again.

    3. In a seperate bowl, whisk together the flour, cocoa, baking soda, baking powder and salt.
    4. Slowly add in the flour mixture to the butter mixture and mix until well combined.

    5. Because you want the cookies to all be the same size, use a Tablespoon to measure the cookie dough. Roll the dough into balls and flatten slightly.
     

    6. Bake at 375 for 9 minutes. Let them sit on the pan for 5 minutes before attempting to remove them.

    Cream Filling!!

    • 1/4 C. Butter, room temp
    • 1/4 C. Vegetable Shortening/ Crisco
    • 2 C. Powdered Sugar
    • 1-2 tsp. Vanilla
    • Milk (as/if needed)

    Directions: Cream the butter and vegetable shortening for 3 minutes. Add in the vanilla, then slowly mix in the powdered sugar. Add milk 1 Tbs. at a time if needed. Once the cookies are completley cooled, assemble the Oreo cookie sandwhich!

    ENJOY!!!!

    Thursday, September 27, 2012

    5 Chocolate Cupcakes


    Thats right, a recipe for just 5 perfect, homemade, chocolate cupcakes!!! This is for you Brianna, my fellow preggo!!! =D I saw a few recipes online for 2 cupcakes, but the recipes I tried were all gag worthy! I mean it was such a cute idea, I just knew I'd have to perfect it so that they were more enjoyable. In my attempts to perfect a "2" cupcake recipe, my own recipe turned into a "5" cupcake recipe! lol. The more the merrier right!?


    Ingredients:

    1/2 C. Cake Flour
    1/4 C. Sugar
    1 1/2 Tbs. Hershey's Dark Cocoa
    1/4 tsp. Baking Soda
    1/4 tsp. Baking Powder
    1/8 tsp. (2 pinches) Salt
    1 Egg White
    2 Tbs. Softened Butter
    2 Tbs. Water
    2 Tbs. Oil
    1/4 tsp. Vanilla
    Chocolate Chips/ Minis


     Directions;

    1. Whisk together all the dry ingredients.

    2. Add in the wet ingredients and whisk again.
    3. Pour into 5 cupcake molds and bake at 350 for 15-18 minutes. (These cupcakes can easily be overbaked resulting in a dry cupcake. Be very careful and check on them often. I've noticed that even 1 minute can make a difference and that they can continue baking in their pan even after you pull it out of the oven.)

    4. After I've pulled them out of the oven, I wait a few minutes and then put them in a ziplock bag. In my mind I feel like this helps the cupcakes stay moist. I usually leave them in until they are completley cooled or I'm ready to frost and eat them!!!
     

    Frosting:

    2 Tbs. Melted Butter
    3 Tbs. Cocoa
    1/4 tsp. Vanilla
    1/4 C. + 2 Tbs. Powdered Sugar
    1-2 tsp. Milk
     
    Directions: Mix all the ingredients together and frost once the cupcakes have cooled.


    You may be wondering if you can substitute All Purpose Flour for the Cake Flour, NO, you can't. Sorry it has to be Cake Flour and the picture below explains why. The taste and texture are very off and the cupcake sinks. It is all too sad.
     
    Inspiration for my recipe came from the blog, Manhattan Craft Room.
     

    Tuesday, September 25, 2012

    Necklace Dress Onesie Makeover

    I saw these adorable ideas on Pinterest, of course!,  and although I'm not the most experienced of sewers, I thought I'd give them a whirl! It was sooo much faster than I thought it would be, even with 2 kids and a very needy puppy! =D


    I thought the original tutorials were quite informative so I'll just share their links!

    Necklace

    Idea from: Tutus and Teaparties
     Tip: Do the necklace part first! Let it dry and iron it, then add the ruffles!!! My necklace job was far from perfect, but from a distance you can't tell, right!?

    Ruffly Dress


    Idea from: Sugar Baby Boutique
    For the ruffly dress, measure across the onesie (mine was a newborn size and 6 inches across) and multiply by 4 1/2. (I multiplied by 3 and clearly its not ruffly enough!)


    I bought the headband that came with 2 small matching flower clips at Wal Mart for $3. They were very "meh" so I added the bling!!! And now it's WOW! lol The flowers are Hot Pink, but, my lighting is terrible and it looks red/ oange in the pics! Sorry! I guess ya'll will have to see it in person!

    Saturday, September 22, 2012

    "Chubby Chicken"

    Okay, the original name is "Crockpot Chicken and Rice" but that doesn't hold a candle next to the name my friend calls this recipe, "Chubby Chicken!" lol. I was looking for crockpot recipes and stumbled upon this little gem from StickAForkInIt. I loved it so much I decided to share it with you! At first I thought all the ingredients sounded really weird together, but BOY was it DELICIOUS! I beg you to give this a try, you won't be diasppointed! =D

    Ingredients:

    2-4 Medium Sized Chicken Breasts
    1 Pkg. Cream Cheese
    1 Can Cream of Chicken Soup
    1 Pkg. Dried Italian Dressing Seasoning (Like the homemade salad dressing packets.)
    Rice (I used 1 Cup Jasmine Rice and it was plenty!

    Directions:

    1. In a crock pot add cream cheese, chicken soup, and italian seasoning packet. Cook on high for 30 minutes.
    2.Add in your fresh or FROZEN chicken breasts.
    3. Cook on high for 4-6 hours. Stir about once every hour.
    4. When you're ready to eat, cook the rice.
    5. Layer rice, chicken and sauce!!!


    Seriously, the chicken was SO tender, that when I tried to cut it into strips, all it wanted to do was shred! Probably my new favorite crock pot recipe!!!

    French Bread Pizza/ Pizza Bread


    Sorry I've been MIA for awhile! I've been super busy but hopefully I can win back your love with a few recipes I've had up my sleeves!!
    For "my" French Bread Pizza, I combined a recipe my mom gave me, with the idea I've seen on pinterest to use French Bread as a pizza dough/ base! This recipe is different in the fact that it doesn't use pizza sauce! However you can dip these pieces in some store bought pizza sauce if you wish! We don't but it has crossed my mind! (For my mom's original recipe you buy frozen bread loaves, let thaw, let rise, roll out and spread the cheese mixture and toppings all over, roll up and bake until golden brown! She calls it "Pizza Bread!")
    My husband and I love this super easy recipe and we often eat it as a meal. I've thought about using it as an appetizer or as finger food at a party!

    Ingredients:

    1 Loaf of French Bread (Mine was about 12 inches long.)
    1 Egg
    1/2 C. Parmesan Cheese
    1 C. Mozzarella Cheese
    1/8 tsp. Pepper
    1/4 tsp. Garlic Salt
    1/4 tsp. Oregano
    1/4 tsp. Parsely
    Plus your favorite pizza toppings!!! (For me it's just plain ol' Pineapple! Darren loves "the works" but I didn't have time to buy and prep all the veggies and meats for him, so he settled for a Pepperoni and Pineapple!)

    Directions:

    1. Mix together the egg, parmesan, mozzarella, pepper, garlic salt, oregano and parsley.
    2. Cut the french bread in half and spread the cheese mixture evenly over both sides.

    3. Add your toppings!!!!
    4. Bake at 375 for 15-25 minutes. You want the cheese to be melted and the bread to be toasted!
    5. Cut into slices and EAT!
     
    This picture makes my mouth DROOL! I love melty cheese!!!

    Out of the oven!

    The best pizza topping!!!

    Eat hot and enjoy!!!
     
    I hope ya'll enjoy this recipe! My mom has made it for us since we were kids and I love all the memories this meal/ snack brings up for me! =D

    Tuesday, August 7, 2012

    Chinese Lettuce Wraps


    (sorry for the camera phone photos! Our camera was lost but I'll get better ones uploaded as soon as we get a new camera!)
    I am so lucky to share the joy of cooking and baking with my oh so sweet Mother In Law! She has given me several recipes. Some that she has collected and others that she came up with herself! This is one such masterpiece that she invented! Of all the recipes she has given me, I must admit this is my most favorite! I usually make it as an appetizer but I'll admit I've made it as a snack before too!
    p.s. I secretly LOVE these WAY more than P.F. Changs version!

    Chicken Filling:

    2 Chicken Breasts (size medium- large)
    1 Can of Water Chestnuts (small can)
    4-6 Tbs. Iron Chef's General Tso Sauce (see pic below)

    1 Head of Lettuce

    Spicy Chinese Sauce:

    2 Tbs. Kikkoman Soy Sauce
    1/2 tsp. Hot/ Spicy Chinese Mustard
    1 tsp. Chinese Chili Sauce (my family calls it "Rooster Sauce". lol)
    *I have pictures of all of these below for a visual verification! And you can find all of those ingredients at Wal Mart in the Chinese section.*


    Directions:

     1. Cut up your raw chicken breasts into 1 centimeter sized cubes. Also cut up your water chestnuts into slightly smaller sized cubes. (Really the size and ratio of chicken to water chestnuts is up to you!)

     2. Put the chicken and water chestnuts in a frying pan and drizzle with Iron Chef's General Tso Sauce. You just want enough to cover the chicken, about 4-6 Tbs. There really isnt a specific amount, but if you're in doubt add a little more.(Usually when I list a specific brand it's important. =D)

    3. Cook the chicken and water chestnut mixture until the chicken is cooked through. Set aside.


    4. To make the Spicy Chinese Sauce, add the Soy Sauce, Rooster Sauce and Spicy Mustard together and mix well. (Hopefullt his picture will clarify what I'm talking about!)
    If you decide the Spicy Chinese Sauce needs more of a punch, just add a little more Rooster Sauce! And leave some out if its too spicy!

    5. Tear pieces of lettuce of of the head of lettuce. Ideally you want the pieces to be ABOUT 3x5 but it usually tears off in askewed sizes and shapes. =D

    6. Assemble!!! Add chicken mixture to the middle of a lettuce piece, then  add as much Spicy Chinese Sauce as you wish, roll up and DEVOUR! =D

     Just a tip, go easy on the Spicy Chinese Sauce, it may be hotter than you think and you can always add more if you need to! It has taken people off guard before! A little goes a looooooong way!