Page Design

Wednesday, March 21, 2012

Cake Batter Cinnamon Rolls

Did ya just about pass out reading the blog title!? Lol, I almost did, when my friend Alyssa sent me this recipe. (It was a very nice, subtle hint for me to make these and let her know if they were any good!) ;D Haha, well they are! I'm guessing another reason she wanted me to attempt them first is because the original recipe isn't very accurate and has ALOT of guesstimate/ use your best judgement during the whole process. But don't you worry, I wrote everything I did down, so it will be ALOT clearer! Please, read through my directions before you attempt, to avoid confusion, just in case my directions are not as thorough as I think they are. =D

What You'll Need for the Dough: Makes 12 good sized rolls!

1 Pkg. Yeast or 2 1/2 tsp. from a Jar
1/2 C. Warm Water
1/2 tsp. Sugar- this is for the yeast
3 Tbs. Shortening
1/2 C. Sugar
1 1/2 tsp. Salt
1 C. Hot Water- near boiling
1/2 C. Yellow Cake Mix
Roughly 6 C. Flour
1 Egg, Beaten
---------------------------------------------

What You'll Need for the Filling:

2 Tbs. Melted Butter
1 C. Brown Sugar
1 C. Yellow Cake Mix
Cinnamon- I used less than 1 teaspoon
Sprinkles!
-------------------------------------------------------

What You'll Need for the Frosting/ Icing:

2 Tbs. Melted Butter
1/2 C. Yellow Cake Mix
1 tsp. Vanilla Extract
1 1/4 C. Powdered Sugar
1/4 C. Milk - more if you want an "icing" texture

Directions:

1. Mix shortening, 1 c. sugar, and salt with the hot water. Mix until the shortening has melted completley. Let this mixture sit aside until it is a lukewarm temperature.
2. While the previous mixture is cooling, in a small bowl mix together 1/2 c. warm water, yeast and 1/2 tsp. sugar together. Let the yeast mixture set for at least 5 minutes to get the yeast activated.
3. Add 2 cups of flour and 1/2 c. cake mix to the mixture from step #1. Use your mixer to beat the dough until smooth.
4. Add the yeast water and mix until smooth.
5. Add in the beaten egg.
6. Add in 2 additional cups of flour. Attach your dough hook to your mixer and add 1/2 cup of flour at a time until the dough no longer sticks to the sides of the bowl. I used about 2 more cups. Let your dough hook work it's magic for about 4 minutes, or knead by hand which will take about 10 minutes. You want the dough to have a nice satiny look and feel .
7. Cover the bowl with saran wrap, and let the dough rise for 30 minutes.
8. Flour your counter then roll out your dough to a rectangle about 17 inches x 21 inches. This was just a tiny bit bigger than my silicone mat.
9. Using a silicone brush, spread the melted butter onto the dough. Then add the filling. (1 c. Brown Sugar, 1 C. Cake Mix, a REALLY LIGHT dusting of Cinnamon, and Sprinkles if you wish.)
10. Roll the dough up as tightly as you can and pinch the seam closed.
11. Use thread or dental floss to cut the rolls. Cut off the uneven ends, you won't be using them. Then cut each roll about 2 inches wide, you should get about 12 rolls.
12. Grease, or better yet, use parchment paper to line 1 large cookie sheet or 2, 9x13 pans. ( I wish I had used the pans! 6 rolls per pan.) Evenly space the cinnamon rolls, cover with a clean dish towel and let them rise for about 30-60 minutes until doubled in size.
12. Bake at 425 for 10 minutes, reduce the heat to 350 and bake an additional 5-7 minutes.
13. While the rolls are baking, prepare the DELICIOUS frosting. Seriously this stuff is to die for! I prefer my frosting to be nice and thick and I like to spread it on warm cinnamon rolls, but if you prefer more of an "icing" texture, then just add extra milk 1 Tbs at a time until you get the consistency you're looking for.
The middle of a cinnamon roll is always my FAVORITE part!! I hope ya'll enjoy these as much as I am!

Sunday, March 18, 2012

Rainbow Jello

I saw this FUN idea on Pinterest, but used my Mother In Law's recipe for a Jello Salad. I twisted it just a tiny bit to make it work for this idea and it worked out PERFECTLY for my St. Patrick's Day dinner!

You Will Need:

Jello, the small boxes, in Red, Orange, Yellow, Green, Blue and Purple
4 C. Cool Whip
6 C. Boiling Water
3 C. Ice Cubes
Starting with the bottom layer, Grape/ Purple Jello, mix in 1 C. Boiling Water until dissolved.
Then mix in 1/2 C. Ice Cubes and mix until dissolved.
Finally mix in 1/2 C. Cool Whip and mix until dissolved.
Pour into a 9x13 pan and refrigerate for 45 minutes until set. Continue on to the Blue/ Blue Raspberry layer using the same steps. Repeat for the Green, Yellow, Orange and Red layers, waiting 45 minutes between each layer so the Jello sets. Once the Red layer is set, smooth 1 C. of Cool Whip on top! Super, easy, super time consuming, SUPER YUMMY!!! Top with rainbow sprinkles if you wish!!

Sunday, March 11, 2012

Swirled Shortbread Cookies!

One of my top 10 very favorite cookie recipes! And they actually TASTE as good as they LOOK! (I swear they taste just like the cookies from the bakery!) I like how you can personalize these for each holiday or party theme! Eat them alone or with hot chocolate!!! YUM! (This makes ALOT I usually cut the dough in half, wrap it in saran wrap, place in a Freezer Ziplock Bag, and place in the freezer for another day!)
Ingredients:
1 C. Sugar
1 C. Powdered Sugar
2 C. Butter Flavored Crisco
1 tsp. Vanilla
1 Egg
4 1/3 C. Cake Flour- VERY important. Has to be CAKE Flour
3/4 tsp. Baking Soda
3/4 tsp. Baking Powder
1/4 tsp. Salt
Directions:
Preheat the oven to 375. In a medium bowl, cream together sugars and
shortening using an electric mixer for about 5 minutes until light and fluffy. Slowly
add vanilla and beaten egg while mixing.
In a separate bowl, whisk cake flour, baking soda, baking powder and salt.
Gradually add the flour mixture to the creamed mixture, mixing on slow speed
until just blended. Set aside half of the dough and color it pink. You now have
two dough balls; cut these both in half, so that you have four dough balls. (2 white and 2 pink)

This recipe will make 2 cookie dough rolls. Roll out each of the dough balls
until they are ¼ inch thick. You can use wax paper, and to keep the dough from sticking, use powdered sugar!
Place the pink doughs over top the white doughs
and roll them out just a little bit. Trim the dough until it is a nice, clean cut rectangle.
Roll up the flattened doughs and roll around in sprinkles!
Slice the cookie dough rolls into 1/2 in slices and bake for 9-10 minutes. Let cool on pan for 5 minutes before removing them to a cooling rack.
Tip: You can use these little ball sprinkles, but they are hard and crunchy, we prefer the Jimmy sprinkles, because they are soft but still add the sprinkle fun!
p.s. I got the cookie recipe from here, it's suppose to be a copycat recipe of Paradise Bakery's famous Sugar Cookie, but it reminds me way more of a shortbread cookie!
Also I got the idea of the swirl effect and sprinkles from here!div>


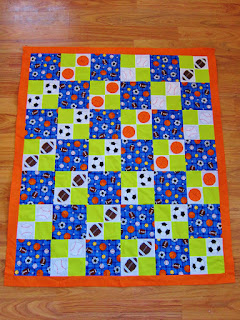
Boys Sports Quilt!

This little gem is for my Ball Lovin' Nephew! I thought it was so cute, I just had to make a post to brag about it! I cut out all of the balls to make the applique. (It's pronounced "ap-lee-kay" if you call it "ap-leek" people will look at you crazy. Just from what I've heard! lol) I'm hoping they'll fray real cute, I think frayed appliques are so cute for boy stuff! The appliques also have crinkle in them!!
After making this quilt, I think I might have to make somethign for Kaiden, he's gotten quite attached to seeing it around! lol. And Jaxton just LOVES the crinkle balls! Haha! I actually finished this BEFORE I made Jaxton's Crinkle Taggie Blanket! =D

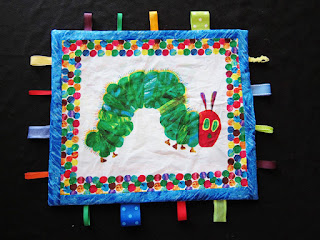
Baby Taggie Crinkle Blanket!


Oh my goodness, this was SOOOO fun and super easy to make! I've always wanted to make one, and figured I better get on my way before Jaxton got too old for it! (Cause who knows when we'll have another little one! lol.)
This is the back of the blanket, just as cute as the front!!! This panel of fabric came with 3 images. The 2 caterpillar pictures I used and a butterfly! These 2 pix matched up perfectly but the Butterfly image was WAY bigger and didnt match up right so I couldn't use it. =(
I wish I had known Jaxton's personality while he was in the womb because instead of doing a 101 Dalmatian theme I totally would have gone for the Very Hungry Caterpillar theme! This boy LOVES to eat!

I didn't take many pictures throughout this project, so I can't really make a tutorial about it, BUT for in depth directions, this website is great!
And here is a cute youtube video of the same idea but using an alphabet letter instead!
The only thing I did differently was to add a Chip Bag in the middle to add the crinkle effect.****
I knew I wanted to do a Hungry Caterpillar Taggie Blanket for Jaxton, but I couldn't believe how perfect this small panel of fabric was! I was so excited when I found this fabric!!!
Here is the fabric panel I purchased, and here is a fun panel to make a BIG taggie!
I added a 1 inch blue border, so the final size was 16.5x 14 inches. Each ribbon I cut was 4 inches long.
This is how you want the ribbons pinned down. Then I sewed each ribbon over 3 times for security. Then you sew it right sides together, with batting (and a chip bag) just as if you were sewing a blanket. Leave a small opening so you can turn it inside out, then hand stitch the small opening, closed.
****The reason this top part is all crinkly is because in between the batting and the cotton fabric I added a Tortilla Chip Bag! Yup, I wanted a CRINKLE Taggie Blanket! It was totally an experiment and it worked! I obviously won't be able to iron or dry it, but Jaxton loves the crinkle noise! After doing a little more research I found that the idea of using a food bag for DIY Crinkle blankets is pretty common! I just wish they still made those loud Sun Chip bags! haha!

Tuesday, March 6, 2012

Cookie Dough Fudge!


This recipe revolves around 2 of my very favorite things, cookie dough and fudge! I will tell you, it tastes JUST like cookie dough, gritty sugar texture included, but melts on your tongue like fudge! I was HOPING for a smoother texture, but it is cookie dough after all! =D
I found this delightful recipe here! (Thank goodness for creative bakers like this gal!)
Ingredients:
1 3/4 C. White Sugar
3/4 C. Brown Sugar
1/2 C. Heavy Cream
1/4 C. Milk
1 Tbs. Corn Syrup
3/4 tsp. Salt
2 Tbs. Butter
1 tsp. Vanilla
1/2 C. Flour
1/3 C. Mini Chocolate Chips
Directions:
Spray a 9x13 pan with non-stick spray and set aside. In a saucepan, combine the sugars, cream, milk, corn syrup and salt. Cook over medium heat, stirring occassionally, until the mixture reaches the soft ball stage. (I keep a cup of cold water handy, to easily test what ball stage the sugar mixture is at.) Remove the sugar mixture from the heat and stir in the butter, flour and vanilla.
Pour the sugar mixture into the 9x13 pan and allow it to cool for about 15-20 minutes.
Once the dough has cooled, move it into a stand mixer and beat with the paddle attachment for 4-5 minutes.
While the fudge is mixing, line an 8x8 pan with waxed paper. Once the fudge is done mixing, transfer the fudge to the small pan. Sprinkle the mini chocolate chips over top and press them in lighlty. Cover the pan and allow the fudge to set for at least 2 hours in the fridge. Serve and enjoy!!!!
Just curious, is your mouth watering yet or what!? lol!

Sunday, March 4, 2012

Cordial Cherries


Have you vver wondered how they make Cordial Cherries!? Well let me tell you, it's ALOT easier than you'd think! And they taste DIVINE! Be warned though, they need to set for at least 1 week. So this recipe is not for the impatient! =) I got this recipe from the website, AllRecipes.com about 3 years ago and we've really enjoyed them!
Let's get started, Im sure you are all dying to try these beauties!
What You'll Need:
60 Maraschino Cherries WITH Stems, about 2 jars
3 Tbs. Melted Butter
3 Tbs. Light Corn Syrup
2 C. Powdered Sugar
2 C. Semi- Sweet Chocolate Chips, or any chocolate to dip in!
Directions:
Drain the cherries from their syrup and let them set on a paper towel to dry. In a bowl mix together the butter, corn syrup and powdered sugar until it forms a dough. Chill for a few minutes in the fridge to stiffen, if necessary.
<---- How my work station looks!
Now this next idea came from years of working with these lil guys! I get out a small bowl and pour some powdered sugar into it. Then I scoop out about 1 tsp. of the dough, roll it into a ball and then roll it around the powdered sugar. This makes the dough not so sticky when you're working with it. Now wrap the powdered sugar covered, dough ball around a cherry. (Got that? 1 tsp of dough is wrapped around each cherry.)
If you're having a hard time getting the dough to cover the cherries, try to flatten the dough ball into a disc.
<----- Please ignore the quite chipped, Valentine's Day decorated nail. lol. They were quite pretty and fun for awhile though.
Then, carefully smooth the dough until it covers the cherries.
Once all the cherries are covered,I let them sit in the fridge for a few minutes while I melt the chocolate. You can use any chocolate, semi-sweet, dark, milk I guess even white if you really wanted too! lol. I usually use semi-sweet, but whenever we order these from candy stores we usully go for the dark chocolate! YUM!
Since their stems are still attached, these should be way easy to dip in the chocolate! Be sure to place them on waxed paper!!!!! (Waxed paper is essential if you dont want to tear the bottoms off when you go to pick one up!) Then set them in the fridge for a few minutes to get the chocolate hard. (If you're not a fan of the stems, they don't really bother us, but I assume you can attempt to pull them out before the chocolate sets and gets too hard. Then you can dab a bit of chocolate on top to cover the hole!)
Some people would tell you that you're all done, BUT WAIT! Again, this tip comes from making these for a few years. What you will need to do is go through every cherry and dab extra chocolate on the bottoms! Most of the cherries will only have a very thin layer on the bottom and when the cherries start to turn to a liquid, the juices spill out of the bottoms. All that work ruined!
<---- This is probably worse case scenario. Most won't be this bad, but be sure to reinforce all the cherries even if they look fine!
Please remember to place them on waxed paper!
Once you're done with all those steps, the hard part comes, waiting for at least 1 week, 2 weeks for best results! During this time, the remaining juices from the cherries will liquify the powdered sugar dough!
I leave mine out on top of the fridge, so I can attempt to forget about them. Lol. I usually can't wait longer than 1 week though! =D
After the long wait, you will be highly rewarded!!
Haha, Darren just LOVES these!
I like using these for fun at home dates! What a fun way to change things up a bit! Adding a bowl of Lindor Truffles, Sixlets and Reese's Peanut Butter Eggs doesn't hurt the cause either! Or Jones Soda or 2 Redbox movies! Because we like options! haha! =D