Page Design

Monday, May 14, 2012

Chocolate Raspberry Cheesecake


My husband and I just LOVE eating at the Cheesecake Factory! Whenever we would go my husband would encourage me to pick out a cheesecake after our meal. As a creature of habit, I would always go for the Chocolate Raspberry Truffle Cheesecake! I just knew I would have to do my best to recreate this masterpiece! My recipe is not an exact repilca of the Cheesecake Factory's, but it tastes VERY similar and satisfies my cheesecake cravings!

This recipe is easily one of my best known desserts! This baby has made me famous among my friends and family for over 2 years now! It's bittersweet to be giving this recipe away, but I hope you all will love and enjoy it as much as my family has!

Oreo Cookie Crust

1 Pre Packaged Oreo Cookie Crust

I will admit to you, I will usually buy a pre-packaged Oreo Cookie Crust from the store, dump it into my springform pan and firmly smooth it out into a nice, even crust. I do this because it's probably the same price as a package of Oreo cookies anyways and saves me time (and the guilt of throwing away all of those yummy Oreo cream fillings). But if you choose to, you could easily make the crust yourself with the following recipe:

Ingredients:
24 Oreo Cookies
1/4 C. Melted Butter or Margarine

Directions:
Remove all the cream fillings from the 24 cookies. Add the cookies to a food processor or blender and finely crush the cookies. Mix with 1/4 c. melted butter. Evenly spread the Oreo Cookie Crust in the bottom of a springform pan. Set aside.

Raspberry Filling:

This layer is optional. It doesn't affect the flavor much. I mostly use it for the beautiful raspberry ribbon it creates. If I'm making this with a short time allowance I will skip this step. Sometimes I will  make this filling the day before. I made a whole post dedicated to this wonderful Raspberry Filling. =D (I've seen Raspberry Filling in a can at the store before. I've never used it before, but I'm thinking I may try it next time I whip one of these up!) For now I just use the following recipe.

Ingredients:1, 12 oz. Frozen Bag of Raspberries (You can also use fresh Raspberries, about 2 1/2 cups.)
1 C. Water
1/2 C. Sugar, or more to taste
1 tsp. Cornstarch

Directions:
1. Put the whole bag of raspberries, 1 cup water and 1/2 cup sugar into a saucepan.
2. Turn the burner to medium- high and let the sauce start to boil.
3. Stir the sauce constantly until the raspberries have completely broke down.
4. Take the sauce off the heat and run the sauce through a sieve. Use a spatula to help push the sauce through the sieve. (This step is to eliminate those nasty seeds. If you like lots of seeds you can skip this step.) I usually put about 1 tsp. of the seeds back into the sauce, because I like the authenticity of it! And to me it's the perfect amount!
5. Return the seedles, or near seedless, sauce back to the saucepan. Add in 1 tsp. Cornstarch and simmer at medium heat. It may take 15-20 minutes of simmering to get a nice thick texture. Keep in mind, it will thicken quite a bit as it cools. If you make it the day before, you may need to heat it up to make it easier to spread.
You will only need about 1/2 cup- 3/4 cup of the Raspberry Filling.

Chocolate Raspberry Cheesecake & Assembly

1/4 C. Sugar
3, 8 oz. Packages of Cream Cheese
1, 14 oz. Can of Sweetened Condensed Milk
2 Cups Semi- Sweet Chocolate Chips
4 Large Eggs
2 tsp. Raspberry Extract
1/2 C. Mini Chocolate Chips

1. In a large mixing bowl, beat Cream Cheese until light and fluffy, about 2 minutes. 
2. Gradually beat in Sweetened Condensed Milk until smooth.

3. Using a double boiler, melt the 2 cups of semi- sweet chocolate chips.


4. Add in the remaining ingredients, including the melted chocolate, and beat until well combined.
5. Pre-heat oven to 300 degrees.
6. Pour half of the Cheesecake mixture over the Oreo Cookie Crust in the springform pan.

7. Layer about 1/2 cup -3/4 cup of the Raspberry Filling (just put enough on to make ya satisfied) over the Cheesecake mixture in the springform pan and evenly spread.
8. Add the remaining half of the Cheesecake mixture over the Raspberry filling.
9. Optional: Make a water bath to prevent cracking in your cheesecake. (pour boiling water into a 9x13 pan and place on the bottom rack in the oven. The cheesecake will go on the middle oven rack.)
10. Bake the cheesecake at 300 degrees for 1 hour. Open the oven to check the cheesecake after 1 hour. (This is also important to let out lots of the heat for the following step).
11.  Turn off the oven and leave the cheesecake in the oven for 1 hour more. (Just to be clear, the cheesecake will bake for 1 hour, then rest for 1 hour in the oven.)
12. Remove from the oven and let cool on the counter.

 Chocolate Ganache

If you choose to cut out each piece of cheesecake and then drizzle the ganache over each individual piece, you may want to double the following recipe.

Ingredients:
1/3 C. Semi- Sweet Chocolate Chips
4 Tbs. Heavy Whipping Cream
1/4 tsp. Vanilla Extract.

Directions:
1. In a small saucepan combine the chocolate chips and the heavy whipping cream.
2. Cook until the chocolate chips have melted and the mixture is well combined.
3. Remove from heat and add the vanilla.
4. After the cheesecake has cooled, top with the ganache and let the Cheesecake chill in the fridge for at least 2 hours or, for best results, overnight! (It's a good idea that once the ganache has set, maybe 30 minutes, to cover the cheesecake so that the fridge doesn't dry it out, especially if you pre- slice the cheesecake!)


Big Thanks to the following website/ recipe contributor for posting the recipe to inspire my Chocolate Raspberry Cheesecake!!!
http://allrecipes.com/recipe/chocolate-cheesecake/detail.aspx


Thursday, May 10, 2012

Winger's Sticky Fingers

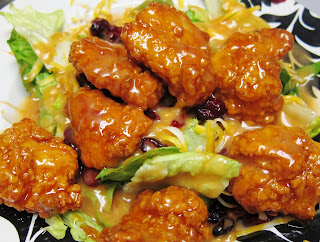
When I was pregnant with Kaiden my cravings were for McDonald's Fries and Diet Sodas. When I was pregnant with Jaxton I craved ALL forms of Sugar and also Salads, in particular Winger's Sticky Finger Salad! I can't even remember how many times I talked Darren into picking up a salad for me on his way home. I must have ate there at least once a week! (It should be noted that Darren is AMAZING at getting me my cravings when I'm pregnant! And when I'm not!) Anyways, this little gem would have been quite helpful back then!


Of course I still love Sticky Finger's and now that we've moved away from any Winger's Restaurants, I had to think of a back up plan!
I was amazed at how similar this recipe tastes to the original. The only difference was that it wasn't as spicy as the restaurant's recipe. I'm wondering if upping the hot sauce and downing the sugar would change that, BUT I actually like this less spicy version better! This was a pleasant surprise!
You can use this sauce on breaded chicken strips and serve it with fries or use popcorn chicken to replicate a Sticky Finger Salad, which is what I always do! You can also mix it with 1/2 Ranch Dressing and get Winger's Amazing Sauce which they use as a Salad Dressing for their Sticky Finger Salad and they also use it as a Dipping Sauce for their Fries and delicious Onion Rings.
This is one of my favorite Under 30 Minute Meals and the ingredients are so easy to have on hand!

Ingredients:

Frozen Breaded Chicken Strips OR Frozen Popcorn Chicken (I use the Popcorn Chicken when I make the salad!)
6 Tbl. Frank's Hot Sauce (It HAS to be Frank's! I used the Buffalo version and it tasted great!)
4 Tbs. Water
1 1/2 C. Brown Sugar
1 tsp. Light Corn Syrup (I added this based on a few comments left on the recipe's page. It's optional!)

~The Following Ingredients are for the Sticky Finger Salad~
Romaine Lettuce (I get the prepackaged stuff with the carrots in them! You could also mix a bag of Romaine with a bag of American Blend, my personal fave! You could also just use an American Blend)
Dried Cranberries
Shredded Colby Jack Cheese
Ranch Dressing

Directions:

Heat the chicken in the oven according to it's package directions. In a saucepan add Hot Sauce, Water, Borwn Sugar and Corn Syrup. Cook until the sugar has dissolved. (This will take less than 5 minutes!)


When the chicken is done, put it in a bowl and drizzle some of the sauce over it. Then shake/ stir the chicken until it is drenched with the sauce. Set the chicken aside for now. Put the salad in personal bowls, or on a plate and top with desired amounts of shredded cheese and dried cranberries. Place the sauce covered chicken right on top! I like to make the Amazing Sauce to "dress" my salad. All you have to do is mix equal parts of the Winger's Sauce with Ranch Dressing and drizzle over your salad! You could also just use Ranch!


Bon Apetit!

Tuesday, May 8, 2012

Universal Raspberry Sauce

This recipe is a KEEPER for SURE! I've also used the same recipe for a Strawberry Sauce, but found that recipe requires more sugar, almost double! lol. Anyways, this is the recipe I use to make a sauce for French Toast, Ice-Cream, to drizzle over Bundt Cakes or Cheesecakes, ETC! I also use this recipe, in a jelly form, in the middles of Cakes, Cheesecakes and Pies! So, without further ado!

Ingredients:
1, 12 oz. Frozen Bag of Raspberries (You can also use fresh Raspberries, about 2 1/2 cups.)
1 C. Water
1/2 C. Sugar, or more to taste
1 tsp. Cornstarch

Directions:
1. Put the whole bag of raspberries, 1 c. water and 1/2 c. sugar into a saucepan.


2. Turn the burner to medium- high and let the sauce start to boil.
3. Stir the sauce constantly until the raspberries have completely broke down.


4. Take the sauce off the heat and run the sauce through a sieve. Use a spatula to help push the sauce through the sieve. (This step is to eliminate those nasty seeds. If you like lots of seeds you can skip this step.) I usually put about 1 tsp. of the seeds back into the sauce, because I like the authenticity of it! And to me it's the perfect amount!
5. Return the seedles, or near seedless, sauce back to the saucepan. Add in 1 tsp. Cornstarch and simmer at medium heat until you see your desired consistency.

For a nice syrup, about 5-10 minutes of simmering is what you're looking at. Remember, the sauce will thicken just a bit as it cools. For a nice jelly texture it may take 10-20 minutes.

When I use this recipe to fill cakes or pies, I immediatley take it off the burner and straight way spread it onto the cake/ pie. Since the sauce will thicken as it cools, I like to put it on right away, since the longer it's cooled, the harder it is to spread.


I will most likely refer to this recipe often! ;D P.s. this recipe is FANTASTIC on my favorite chocolate cake recipe! I bake 2, 9 in (or 8 in) circle pans and place the raspberry jelly in between the layers!  Truly DIVINE!

Monday, May 7, 2012

Stuffed French Toast

Darren makes fun of me because at every single restaurant, I have my "go- to" dish. It's the dish I always order when I go there, because it's my fave! Very rarely is there a restaurant where I have 2-3 favorites, but it does happen! Darren is more of a "try a new dish everytime" kinda fella. Which is also good cause' then I can try his! lol. Well at IHOP I always get the Stuffed French Toast! Hey, why mess with the best? Well I was super excited when the grocery stores started selling IHOPs food in the freezer section! And that what we usually do, but I got a hankerin for them today and had a whopping total of ZERO on hand and so, I do what Chelsea's do best, and I IMPROVISED! Even I was impressed with myself! So yumm! Here we go!

You will need my recipe for the Universal Raspberry Sauce. This stuff is great! Depending on how long you cook it, it can be thin  like a syrup for drizzling on cakes or ice-cream, or even thick for a filling in a cake and any consistency in between! It's also safe to refrigerate for up to 2 weeks! (Go to the above link for more pix and more in depth directions if you get confused. I have a feeling I will be referring to that particular sauce quite often!)

Raspberry Sauce:

1, 12 oz Bag of Frozen Raspberries
1 C. Water
1/2 C. Sugar (more if you want it on the sweet side and not the tart.)
1 tsp. Cornstarch

1. Place the frozen raspberries, water and sugar in a saucepan and cook on medium high heat.
2. Boil the mixture until the raspberries have "melted down" and there are no more "chunks".
3. While the sauce is still liquidy, place the sauce in a sieve. Use a spatula to help get the sauce through the sieve easily, this part is to get rid of those nasty seeds. If you like lots of seeds, then you can skip this part. I usually end up putting about 1 tsp of the seeds back into the sauce, because I like just a little bit for the authenticity of it! ;D
4. Once the sauce has been thoroughly sieved, return the sauce back to the saucepan, add in the cornstarch and cook on medium or medium-low until desired consistency.

 For a syrup texture it might take 5-10 minutes and for a cake filling/ jelly like texture it may take 10-20 minutes. Just remember that the sauce will thicken a bit as it cools. Not alot, just a little.

Cream Cheese Filling:

Recipe respectfully from AllRecipes.com

4 oz (half a package) Cream Cheese, Softened
1 C. Powdered Sugar
1 tsp. Vanilla
2-4 Tbs. Milk, possibly more

1. Mix the softened cream cheese and powdered sugar in a bowl, you may need a mixer. Add in vanilla. Add in milk as needed to get a frosting like consistency. You will be plopping this into the center of piece of bread after all and you dont want it spreading all over the place. You want it to stay put.

French Toast:

Sadly I don't have an exact recipe for the stuff! I just mix a few eggs, a little milk, a dash of cinnamon and I'm ready to go. To make the Stuffed French Toast however, we're going to have to get a lil fancy with the bread!

 I used a large cookie cutter and cut out 2 pieces of bread. Then a dropped about 1 Tbs. of the Cream Cheese Filling into the center. Then a squished around all the edges with my fingers and then I used a fork to go around the edges to produce a more reliable seal!


After all those shenanigans you just dip both sides in the egg mixture and cook as you would "normal" French Toast!

Top with the Raspberry Sauce and a little Whip Cream because we're not on diets, right!? lol!

I even got a little lazy with a few and drizzled both the cream cheese filling and the raspberry sauce on "normal" French Toast and it tasted the EXACT same. So you don't need to get too fancy if you don't wanna! =D Hey, I'm NOT here to judge!


Oreo Cake

I know it's been FOREVER since I've posted, moving and remodeling can sure take up a bunch of a person's time! But, we are having fun AND I'll reward you all for waiting with this little beauty! It's my version of an Oreo Cake, I've seen a few of these on the internet and thought I'd better give it a whirl! (Actually I was going to make a chocolate raspberry bundt cake, and even made the raspberry sauce, but at the last minute I changed my mind! And I'm glad I did! I might even like the marshmallow cream better than raspberry sauce, GASP!)

Let's start with my ALL TIME FAVORITE Chocolate Cake Recipe! (And you best believe I've tried quite a few recipes! On one particular day I tried 3 different recipes!!!!!)

Ingredients:

1 Box of Duncan Hines Dark Chocolate Fudge Cake Mix (Yay! to Dark Chocolate!!!!)
1 Large Package of Instant Chocolate Pudding
4 Eggs
1 Cup Sour Cream
1 Cup Vegetable/ Canola Oil
1/2 Cup Warm Water
1 Cups Semi- Sweet Chocolate Chips

Directions:

(This is the best/ easiest part!)
Mix all of the ingredients together in a bowl! Isn't that easy! No particular order, just dump em' all in and mix! Then place in a Bundt Pan (my personal choice) or a 9x13 or 2 rounds, whatever you want and bake at 350 for 45- 55 minutes, this is the time for a Bundt Pan for a different pan you may need to adjust the baking time. ;D


Marshmallow Drizzle!

Now for that delicious Marshmallow Cream! I recommend this recipe, but I tried this recipe which is faster and requires no heating. Either are good, but the one I reccommend is a bit better! With either recipe, once you have finished with all the directions, add a little milk a tablespoon at a time until it has a nice pouring/ drizzling consistency!
For ease, I will say you are like me and tried the easier version this time!
Warning: This recipe contains 1 raw egg white, if you are nervous about consuming raw eggs, try the first recipe I posted!

Ingredients:

1 Egg White
3/4 C. Light Corn Syrup
3/4 C. Powdered Sugar
1 tsp. Vanilla Extract
Milk- 1 Tbs. at a time, as needed

Directions:

  1. In the bowl of a stand mixer with the whip attachment affixed, combine egg white, corn syrup, and salt. Whip the corn-syrup mixture on high speed until it is light, fluffy, and roughly twice its original volume.
  2. Turn your mixer off and spoon in the confectioner's sugar. Beat on low speed until sugar is blended into the corn syrup mixture. Add vanilla and beat in.