Page Design

Saturday, December 31, 2011

Cupcake Cake Bites/ Pops!

Because I am a HUGE Cupcake fan, these are the Cake Bites I make, by far, the most! I also like them because they are 1/2 white chocolate and 1/2 chocolate! These are very simple to make even if you don't have the "special" mold! I have made a few Cake Bite/ Pop posts in the past, but I'm going to try to be very thorough with this particular post!
(Look at my Frankenstein Cake Pops and my Wedding Cake Pops!)
One more thing I feel I should mention, double the recipe (use 2 boxes of cake mix and 1 whole container of frosting) if you plan on feeding them to more than 4 people! You would be surprised how many of these things get ate so fast by so few people! =D
What You Will Need:
1 Cake Mix (I always use Red Velvet by Duncan Hines!)
1/2 Container of Frosting (I always use Cream Cheese!)
1 Bag of Semi- Sweet Chocolate Chips
1 Bag of White Chocolate Chips (I usually only end up using 1/2 the bag.)
Sprinkles!
Peanut Butter Cup Candy Mold, 1 inch size (Optional. I will show you a way to make these without it. It only helps with the "details," but not with "time" which is why I usually don't use them.)
What You're Gonna Do!:
In a bowl mix together the cake mix according to it's package directions!
Pour the cake batter into a 9x13 pan and bake according to package directions.
Once the cake is done baking, let it cool for 45- 60 minutes. You do not want the cake to be cooled completely! You want it to be very slightly warm!
(The reason for this is, if the cake is completely cooled you will end up using the whole container of frosting. Making the cake dough too sweet and too gooey.)
Crumble the not quite cooled cake, into a bowl.
Add 1/2 of the container of frosting!
Mix until the crumbled cake and frosting form a dough! Freeze the dough for 2 hours for easier handling!
Use a 1/4 measuring cup to scoop out the dough.
Divide the 1/4 cup of dough into 4 balls. This is my way of attempting to get all of the Cake Bites the same size. And the PERFECT bite size!
Repeat this process until all of the dough are formed into bite size cake balls.
Melt the bag of semi-sweet chocolate chips with 2 tsp. Shortening.
This is my attempt at a homemade double boiler! The idea is to put 1 inch of water in the saucepan and turn the heat on. The water will turn into steam and melt the chocolate in the bowl above. Remove from heat once chocolate is melted.
Fill the Peanut Butter Cup molds 1/2 way with chocolate.
(Here are the ones I have, I got mine at Michael's. They are okay but one day I want these nice silicone molds. They seem like they would be easier to get the chocolate out and to clean afterwards.)
Make sure one side of the cake balls is flat.
Making sure the flat side of the cake ball is facing downwards, squish into the chocolate molds making the chocoate squeeze up the sides.
Freeze for 1 hour.
IF YOU DON'T HAVE THE MOLDS.... this is also my "cheat" version, since it's quicker.
I use a corn cob holder to help in the dipping process.
Dip in the chocolate, tap off any excess. If for some reason the dough starts sliding off the corn cob holder, just refreeze the dough for another 30- 60 minutes.
Place on waxed paper, chocolate side down.
Place in the freezer for 1 hour before starting the other side.
Melt 1 1/2 cup of white chocolate chips with 1 1/2 tsp. shortening.
To make the "Bites" just use the corn cob holder again, for "Pops" spear the bottoms with lollipop sticks.
Dip the tops in white chocolate. Make sure your sprinkles are close at hand because you want to add the spinkles immediatley after dipping them. With the cake bites being frozen, the chocolate hardens FAST!
Here is the finished Cupcake Bites!!! Look at that detail from the candy molds!
This is what the Cupcake Pops look like!
These are the "cheat" version.
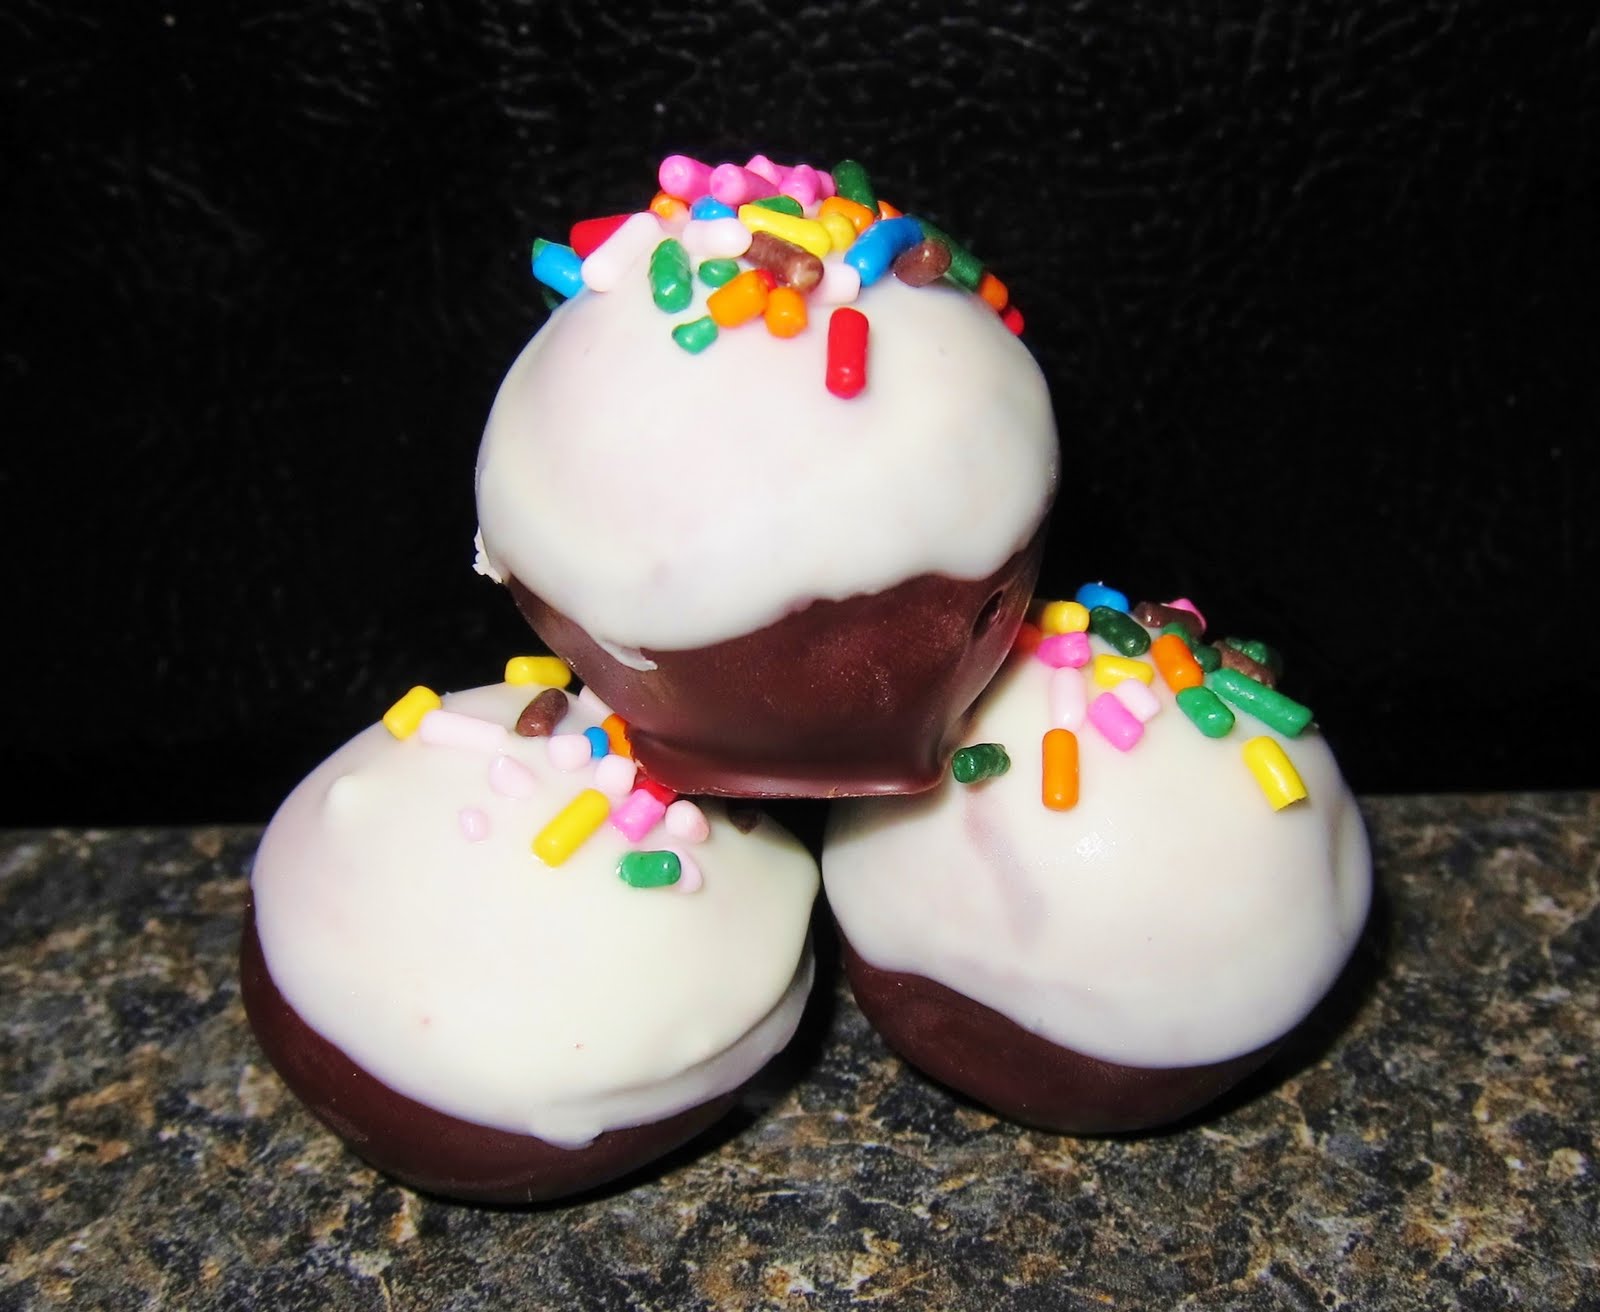
The "cheat" version don't look that bad though!
A bowl of deliciousness!!!!!!!!!

Friday, December 23, 2011

Texas Trash!

Yes it has a random name, but it is sooo delicous! This is one of my family's Christmas Traditions! We make it every year and every year it turns out somewhat different. There really is no rhyme or reason to this. Just throw in what you want and drizzle with white chocolate! It makes a TON so it's great to give away as Christmas gifts to friends and neighbors! My family usually eats it ALL while watching Christmas movies! lol.
Here the recipe I used this year:
1 Box Rice Chex Cereal
1 Box Honeycomb Cereal
1 Box Cinnamon Chex Ceral
1 Bag of Red Hots (my hubby hates them but I love them!)
1 Bag of Peanut Butter M&M's (my fave!)
1 Bag Plain M&M's (This year I used a bag of the Minis!)
1/2 Bag of Pretzels
1 Jar of Cashews (the recipe calls for mixed nuts, but cashews are my fave!)
2 Pkgs. Almond Bark, White Chocolate
Like I said adjust it to whatever you want in there! I'm not a fan of pretzels, but Darren is so I added only half a bag. I made a lot of adjustments to fit my likes! You can add in different cereals, different candies, different nuts, etc!!! Make it personal!
Line your table, or island, with waxed paper. I used a 4 ft x 3 ft area! Dump everything down and mix it all up! Then lay it all out flat!
Melt the almond bark (I only used 1 whole brick and half of the other one, but if you really like white chocolate you can use both whole packages.) Then drizzle the melted white chocolate all over the cereal. Wear gloves and hand mix so that the white chocolate nicely coats everything in the mix.
Let the mix set for 30 minutes or so, to let the chocolate harden and then store in ziplock bags or fun containers to give away as gifts! It's that simple!!
Hope ya'll enjoy!!!!!!!

Wednesday, December 14, 2011

Snowglobe Cards!

I don't have a Cricut/ Silhouette Machine... YET! So I have to get super creative with the cards I make! I saw this idea for a Snowglobe Card and was SUPER inspired, if you can't tell! I think they turned out pretty well and I'm really excited about them!


Can you guess what you will need to make these!?
If you guessed that you're gonna need, 3D Stickers, Scrapbook/ Cardstock Paper, Double Sided Tape, Hot Glue, Glitter and Plastic Sheet Protectors, then you're correct! (By Plastic Sheets I mean these plastic sheet protectors you use for binders. I also used the plastic wrapping that my stickers came in with success!)


I'm sure you can guess how to assemble these super cute cards, but I'll do a short walk through! These got easier with each one I made!
First you will need to choose two colors of cardstock for your card! One will be up front (I used white) and the other will be the background color (I used green).
The background color will be cut slightly larger for a nice border!
The top cardstock will need a big circle cut out of it for the snowglobe! Make sure your stickers will fit comfortably inside!
Don't glue anything just yet!
 
 
With both papers layered correctly, but not yet glued, lay down your sticker where you want it in the snowglobe!
 
 
Now cut a piece from the Plastic Sheet to cover the hole! You will want about 1/4  inch over lap.
Glue the Plastic over the top cardstock (white) with a hot glue gun!
Use one strip of Double Sided Tape on the bottom of the card to get both sides to stick to one another. Remember, just on the bottom! (This is to keep the card in place while you glue around the snowglobe!)
Hot glue around the globe except for an inch at the very top! Be very meticulous because you don't want glitter to be falling out all over!
Now pour in the glitter! However much depends on you!
 
 
Then use hot glue to seal up the top! The first few cards I made had a touch of crinkle at my seam, but I finally got the hang of it and the rest of my cards were crinkle free. =D
 
 
I used glitter paper to make the snowglobes base and then placed a sticker over it for a fun greeting!
VOILA! All finished!
 
 
Here are a few of the cards I made using this method!
And a close up of a great one (crinkle free) I made!

Monday, December 12, 2011

Lionhouse Rolls!

Yes these are as delicious as the originals! Supposably this is the recipe from the Lionhouse Cook Book! I was asked to bring rolls to a family Christmas party and thought I'd try a new recipe! Darren teases me all the time for trying new recipes at the worst times, but I was so glad I did! These are the best homemade rolls I've ever had! And they are sooo easy!

Here's the recipe:
2 C. Warm Water
2/3 C. Non-Fat Dry Milk
2Tbs. Yeast
1/4 C. Sugar
2 tsp. Salt
1/3 C. Butter
1 Egg
5 1/2- 6 C. Flour


Directions:
1. In your mixer combine water and dry milk. Stir until dissolved.
2. Add yeast, sugar, salt, butter, egg and 2 cups of flour. Mix on low speed until ingredients
are all wet, then for 2 minutes on medium speed.
3. Add 2 more cups flour, and mix on low speed until ingredients are wet, and 2 minutes on
medium speed.
4. Add remaining 1 1/2 c. flour and mix until combined .
5. Knead the dough for 10 minutes by hand or 5 minutes with an electric mixer. (I used my dough hook attachment with my kitchenaide mixer.)
6. Place the dough in a well oiled bowl. Turn over once so dough is completley covered with oil. Cover the bowl with plastic, and let the dough rise in a warm place until double in size.
7.  Place the dough on a floured surface and roll it out to about 1/3 inch thick. Brush the rolled out dough with melted butter.
8. Cut the dough into rectangles, about 3 in. x 6 in., and roll up. Place the seam side flush with the pan.  Here is a super helpful video on how to cut the rolls just like the Lion House does!
9. Place on a well greased, or parchment paper lined, baking pan. Let rise in a warm place until the rolls are doubled in size.
10. Bake at 375 degrees for 15 to 20 minutes or until golden brown.
11. Brush with melted butter while the rolls are still warm.

BIG Thanks to Mommy's Kitchen for the recipe!

Salt Dough Ornaments!

How cute are these!? You could use children's handprints or footprints or you could just use cookie cutters and make fun Christmas ornaments to put on your your tree!
The recipe is so simple!
You Will Need:
2 C. Flour
1/2 C. Salt
3/4 C. Water (I used a touch more. If you feel your dough is a little dry just add a little more at a time.)
What You're Gonna Do:
Mix all the ingredients together and knead the dough for 5 minutes with a dough hook or 10 minutes by hand. Roll out dough and make handprints or footprints or use cookie cutters! If you want to attach dough pieces to each other, use a little bit of water. Make a small hole for a hook or ribbon to hang and carefully prick the dough all over to prevent bubbling! Bake at 300 for 20-30 minutes. Bake time varies on thicknesss, I personally had mine in for about 50 minutes. They will harden as they cool, so looks can be deceptive. Once they are cooled you can paint them if you wish! You can also use a varnish to make them shiny wether you paint them or not. =D
I got this idea from Homemade Grits!

Thursday, December 8, 2011

Spicy Hawaiian Chicken Sandwich!


One of my very favorite things to do is combine 2 recipes that sound amazing together! Just call me the "Recipe Matchmaker!" I saw this recipe for a copycat Chick Fil A batter and this idea to assemble the sandwich! These taste like a sandwich Chick Fil A would have on their menu! I am a HUGE fan, if you dont already know! ;) These are quick to assemble and are super flavorful! My very favorite combo! Don't be alarmed by the word "spicy" it's very mild and just the perfect kick!
What You'll Need:
1 Large Chicken Breast (Trust me, this will make 3-4 sandwhiches!)
Pepper Jack Cheese (I used Tillamook brand!)
Canned Pineapple Rings
Burger Buns
1 C. Milk
1 Egg
1/2 C. + 2 Tbs. Flour
1 Tbs. Powdered Sugar
1 tsp. Salt
1/2 tsp. Pepper
Canola Oil for Frying
What You're Gonna Do:
Take the raw Chicken Breast and filet it in have lengthwise.
Now cut the Chicken in half vertically.
Place the 4 pieces of Chicken in a plastic bag and pound flat.
This is the pounded Chicken!
In a bowl mix together the egg and milk. Place the Chicken in the Milk bath and leave in the fridge for 30 minutes.
In another bowl mix together flour, powdered sugar, salt and pepper. Place Canola Oil in a frying pan and turn the heat to medium high. Once the Oil is ready, fry your Chicken! This will take less than 5 minutes! Once the Chicken is cooked through, remove it from the heat.
Now we're going to move the party to the grill! Get the Pineapple Rings ready, butter the Hamburger Buns, and place a slice of Pepper Jack Cheese over top the fried Chicken! Cook on the grill until the Pinapple is caramelized, the Buns are toasted and the Cheese is melted.
Assemble the sandwich and enjoy! We ate ours with BBQ sauce! YUMM!
Side items: Vegetable Shish Kebobs, Grilled Pineapple, Chips, Fries, Fruit Salad, Onion Rings, Potato Salad, Jello Salad, Corn on the Cob, etc!